
Search for your product name or keyword
MEGA2560 PRO MINI ATmega2560-16AU CH340G Development Board
 The MEGA2560 Pro Mini board is a low-cost, miniature version of the popular Mega 2560 microcontroller and is compatible with the Arduino Mega 2560. It has a compact form factor of 54mm x 38mm (2.1″ x 1.5″) and is an excellent solution for developing embedded and stand-alone projects based on the ATmega2560.
The Mega Pro Mini functionalities are identical to the Arduino Mega2560. It uses the original ATmega2560-16AU chip, a 16 MHz high-quality quartz resonator, and the CH340G USB-UART interface.
It has a Micro-USB connector (universally used by most phones, including Android smartphones) to connect the microcontroller to the computer via the CH340 USB-UART adapter (the CH340 driver may need to be installed on your computer).
Connectivity to the computer is provided through the common micro USB connector.
The board can be powered directly through the Micro USB connector, or via the corresponding contacts on the board (Vin and GND). The onboard voltage regulator operates in a range of 6V to 9V DC. (The voltage regulator allows up to 18V input, however, we do not recommend exceeding 9V since the higher voltage can lead to overheating and damage to the device.)
MEGA2560 Pro Mini Arduino-Compatible Development Board Specifications
- CH340G USB-TTL converter replaces the Atmega 8U2/16U2
- Microcontroller: ATmega2560
- Power Out: 5V @ 800mA maximum
- Input Voltage: 5V via Micro-USB connector, or 6V to 9V DC (recommended) via Vin & GND pins
- Maximum Input Voltage: 18V
- Power Consumption: 5V 220mA
- Logic Level: 5V
- Clock Frequency 16MHz
- Digital I/O Pins: 54
- Analog I/O Pins: 16
- Flash Memory: 256 KB of which 8 KB is used by the bootloader
- Data RAM Type/Size: EEPROM 8Kb
- Data ROM Type/Size: SRAM 4Kb
- Interface Type: ISP
- Operating temperature: −40С to +85С
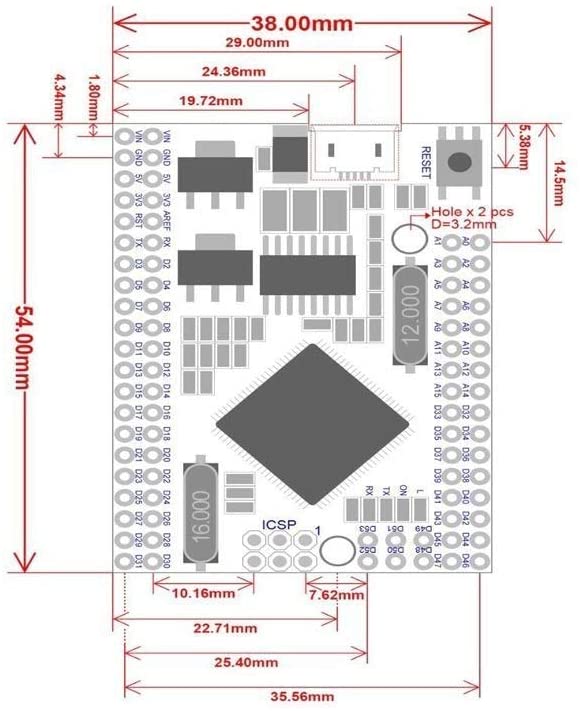
- Size: 54mm x 38mm (2.1″ x 1.5″)
MEGA2560 Pro Mini Pinout and Dimensional Drawings

Arduino Resources and Guides:
Getting Started with Arduino: http://envistia.info/ardgetstarted
Arduino Software (IDE) download link: http://envistia.info/arduinoide
Arduino Mega2560 Documentation: http://envistia.info/ardmega2560
The CH340G USB drivers may need to be installed on your computer before using this MEGA2560 board with the Arduino IDE. If the Arduino IDE cannot communicate with your board, it is probably because the CH340G driver is not installed on your computer.
To install the CH340G driver on your computer:
The CH340 USB IC is made by WCH. You can find the latest version of their drivers in their English translated website here:
http://www.wch-ic.com/downloads/CH341SER_ZIP.html
Click on the “download” button on the WCH page to download the ch341ser.zip file to your computer.
Unzip (extract) the ch341ser.zip file.
Run the Setup application in the CH341SER folder of the unzipped file. See the screenshot below:
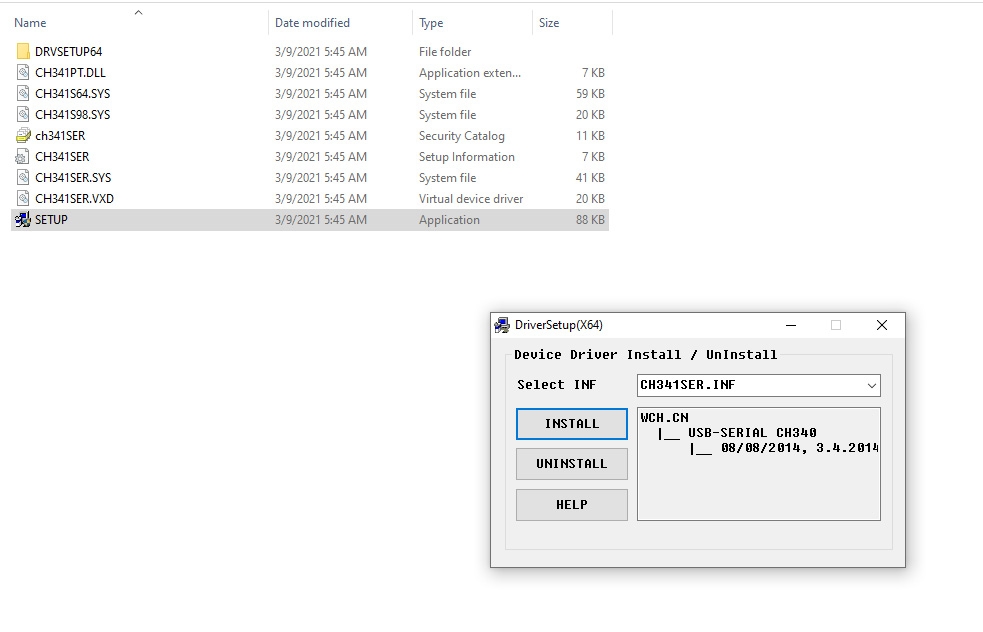
Click the “Uninstall” button first to remove any old versions, then click on the “Install” button.
CH340G Driver Verification for Windows:
To verify that your CH340G driver is working, you should see a difference in the Windows Device Manager and Arduino IDE Ports after plugging the Arduino board with a CH340 into a USB port on your computer.
Device Manager
To check that the CH340 associates to a COM port, open the Windows Device Manager. You can click the Start or ⊞ (Windows) button and type “device manager” to search for the application.
After opening the Device Manager, you will need to open the Ports (COM & LPT) tree. The CH340 should show up as USB-SERIAL CH340 (COM##). Depending on your computer, the COM port may show up as a different number.

Arduino IDE
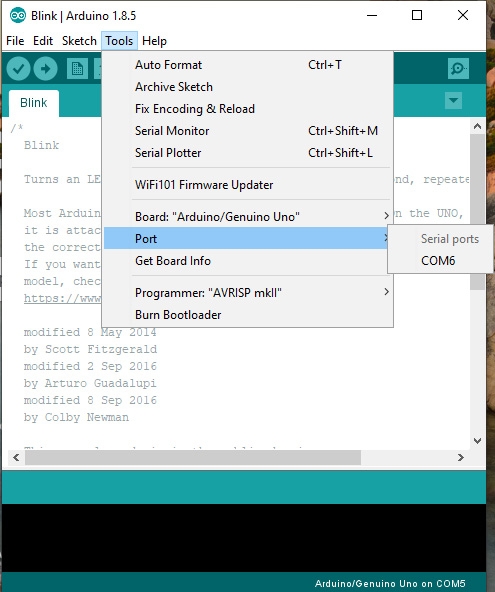
If you have the Arduino IDE installed, you should also see a change in the number of available COM Ports (you may need to restart the Arduino IDE for the board to populate). Without the CH340 connected to your computer, in the IDE click on Tools > Port. Take note of the Serial Ports available:
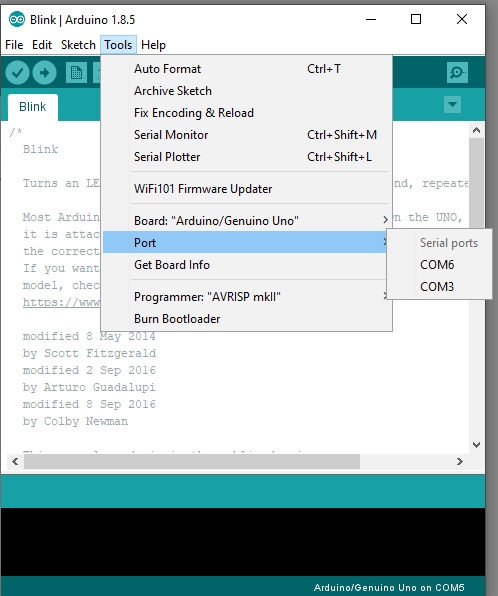
Connect the Arduino board with the CH340 to your computer’s USB port. Click somewhere else on the screen for the menu to refresh itself. Then go back to Tools > Port. A new COM port should appear. By process of elimination, the CH340 should have associated to the new COM port. Select this COM port in order to connect the IDE to your Arduino board.
In the example shown in these two screen shots, the new Arduino CH340 board is associated to COM Port 3.
Copyright © 2021-2023 Envistia Mall
www.envistiamall.com
EM-MICRP-0029