
Search for your product name or keyword
Arduino-Compatible Uno R3 ATMEGA328P Development Board with MicroUSB Connector

This Arduino-Compatible UNO R3 development board has most of the features of the original Uno with the added benefit of an ISP header, CH340G USB interface, and a MicroUSB connector in place of the bulky USB-B connector for easier interconnection and better space management.
The UNO can be programmed over a USB B cable using the Arduino IDE: Just plug in the board, select “Arduino UNO” from the board menu and you are ready to upload sketches. You can power the UNO Board over USB or through the barrel jack. The on-board power regulator can handle any input voltage on the barrel jack from 7 to 15 Vdc.
Specifications:
- ATmega328 microcontroller with UNO Bootloader Installed
- USB Programming Facilitated by the CH340G USB interface
- Micro-USB Connector
- Input voltage: 7-15V on barrel connector, or USB power
- 0-5V outputs with 3.3V compatible inputs
- 14 Digital I/O Pins (6 PWM outputs)
- 6 Analog Inputs
- ISP Header
- 32k Flash Memory
- 16MHz Clock Speed
- R3 Shield Compatible
Arduino Resources and Guides:
Getting Started with Arduino: http://envistia.info/ardgetstarted
Arduino Uno Documentation: http://envistia.info/arduinouno
Arduino Software (IDE) download link: http://envistia.info/arduinoide
The CH340G USB drivers may need to be installed on your computer before using this UNO board with the Arduino IDE. If the Arduino IDE cannot communicate with your board, it is probably because the CH340G driver is not installed on your computer.
To install the CH340G driver on your computer:
The CH340 USB IC is made by WCH. You can find the latest version of their drivers in their English translated website here:
http://www.wch-ic.com/downloads/CH341SER_ZIP.html
Click on the “download” button on the WCH page to download the ch341ser.zip file to your computer.
Unzip (extract) the ch341ser.zip file.
Run the Setup application in the CH341SER folder of the unzipped file. See the screenshot below:
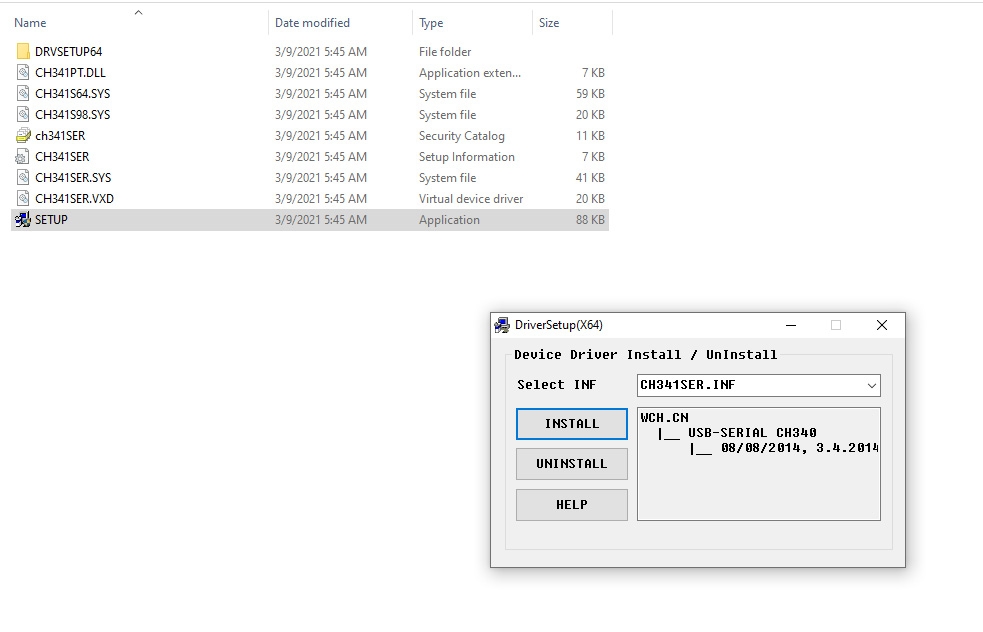
Click the “Uninstall” button first to remove any old versions, then click on the “Install” button.
CH340G Driver Verification for Windows:
To verify that your CH340G driver is working, you should see a difference in the Windows Device Manager and Arduino IDE Ports after plugging the Arduino board with a CH340 into a USB port on your computer.
Device Manager
To check that the CH340 associates to a COM port, open the Windows Device Manager. You can click the Start or ⊞ (Windows) button and type “device manager” to search for the application.
After opening the Device Manager, you will need to open the Ports (COM & LPT) tree. The CH340 should show up as USB-SERIAL CH340 (COM##). Depending on your computer, the COM port may show up as a different number.

Arduino IDE
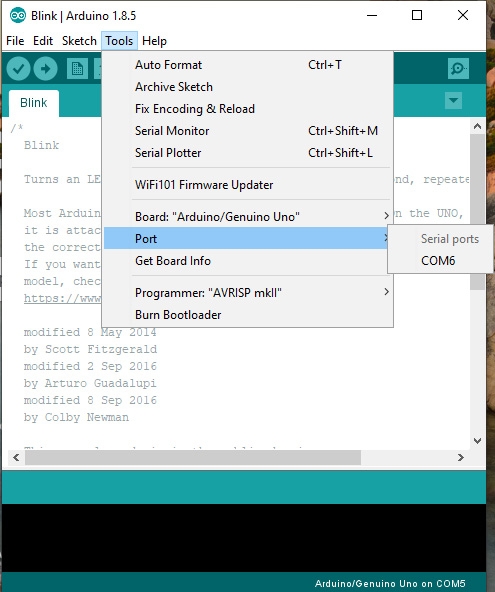
If you have the Arduino IDE installed, you should also see a change in the number of available COM Ports (you may need to restart the Arduino IDE for the board to populate). Without the CH340 connected to your computer, in the IDE click on Tools > Port. Take note of the Serial Ports available:
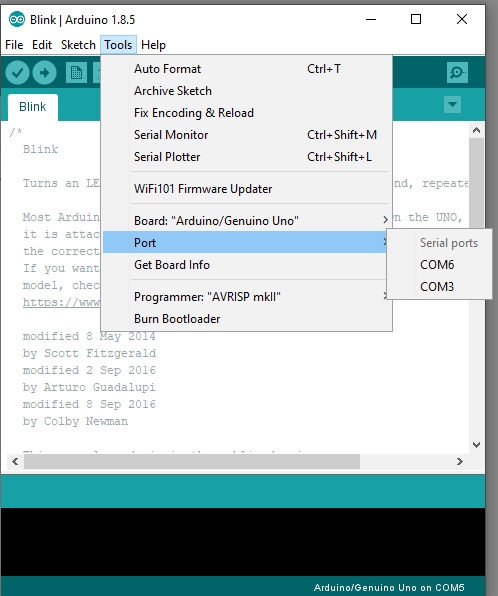
Connect the Arduino board with the CH340 to your computer’s USB port. Click somewhere else on the screen for the menu to refresh itself. Then go back to Tools > Port. A new COM port should appear. By process of elimination, the CH340 should have associated to the new COM port. Select this COM port in order to connect the IDE to your Arduino board.
In the example shown in these two screen shots, the new Arduino CH340 board is associated to COM Port 3.
Copyright © 2016-2021 Envistia Mall
EM-MICRP-0012 / EM-MICRP-0012-CABLE