
Search for your product name or keyword
WeMos D1 R2 Board ESP8266 Arduino NodeMCU Development Board
 This WeMos D1 R2 development board for Arduino / NodeMCU is a WiFi capable ESP8266 based development board in the format of the Arduino UNO R3. This board is compatible with the Arduino IDE and with NodeMCU.
The D1 features an on-board switching power supply which allows you to power the board from a power supply up to 24V, 11 GPIO pins (can be used as input/output/PWM/I²C, except D0), and 1 analog input. The PWM resolution is 10bit (1MHz frequency). The integrated 5V switching power supply (1A) is followed by a 3.3V LDO to supply power for the Wifi module and the 3.3V output (power supply for sensors and shields). Please pay attention when you connect other active peripherals to the I/O pins, because this is a 3.3V logic level device and higher levels on any pin could damage it. The maximum input voltage for the analog pin is 3.2V.
Specifications:
- 80 MHz Processor / 4M Flash
- FCC Certified ESP8266-12F Module
- 11 digital input/output pins, all pins have interrupt/pwm/I2C/one-wire supported (except for D0)
- 1 analog input (3.2V max input)
- Micro USB connection
- Power jack, 9-24V power input
- All IO pins are 3.3V and have interrupt/pwm/I2C/one-wire support except D0
Installation and Programming:
Prior to using this microcontroller with the Arduino IDE, you must:
- Install the CH340G USB drivers, if they are not already installed on your computer (see Resources below)
- Install the ESP8266 board manager:
Enter http://arduino.esp8266.com/stable/package_esp8266com_index.json into Additional Board Manager URLs field under File >> Preferences. You can add multiple URLs, separating them with commas. Open Boards Manager from Tools > Board menu and install esp8266 platform (and don’t forget to select your ESP8266 board from Tools > Board menu after installation).
The following parameters should be set in the Arduino IDE (under Tools):
- Set Board to “LIOLIN (WEMOS) D1 R2 & Mini” or “WEMOS D1 R2”
- Set Upload Speed to “115200”
- Ensure that the Port is set to the COM port associated with the CH340G device (in Windows, in the Device Manager >> Ports (COM & LPT)
These installation steps are covered in much more detail here:
- Programming the ESP8266 WEMOS-D1 Using the Arduino IDE on Instructables: http://envistia.info/programming-wemos-d1-instructables
- Programming ESP8266 WeMos – D1 R2 using Arduino IDE on Elementz Tech Blog:
https://envistia.info/programming-esp8266-elementz
To install the CH340G driver on your computer:
The CH340 USB IC is made by WCH. You can find the latest version of their drivers in their English translated website here:
http://www.wch-ic.com/downloads/CH341SER_ZIP.html
Click on the “download” button on the WCH page to download the ch341ser.zip file to your computer.
Unzip (extract) the ch341ser.zip file.
Run the Setup application in the CH341SER folder of the unzipped file. See the screenshot below:
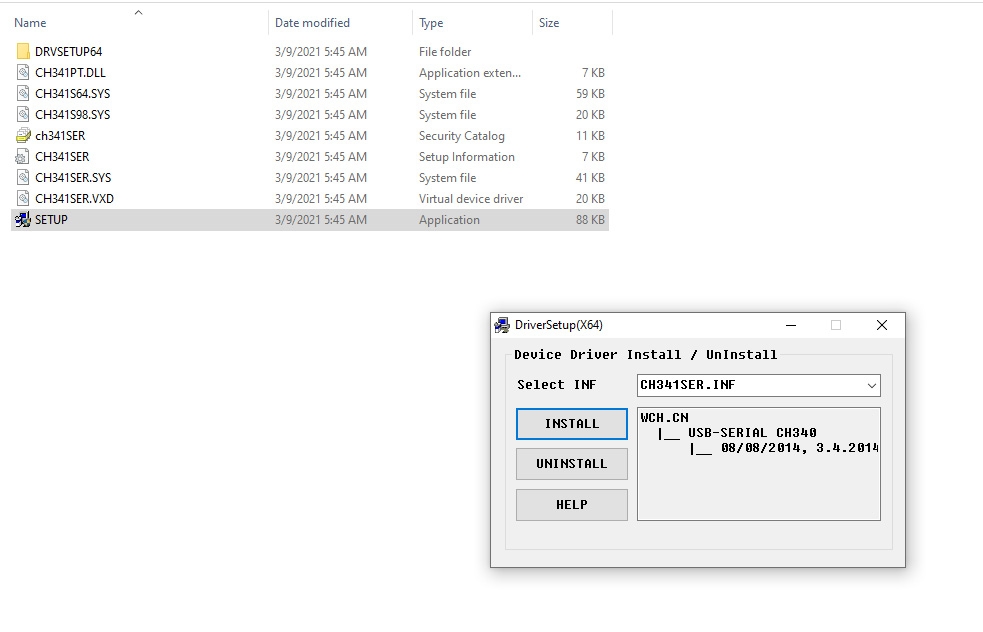
Click the “Uninstall” button first to remove any old versions, then click on the “Install” button.
CH340G Driver Verification for Windows:
To verify that your CH340G driver is working, you should see a difference in the Windows Device Manager and Arduino IDE Ports after plugging the Arduino board with a CH340 into a USB port on your computer.
Device Manager
To check that the CH340 associates to a COM port, open the Windows Device Manager. You can click the Start or ⊞ (Windows) button and type “device manager” to search for the application.
After opening the Device Manager, you will need to open the Ports (COM & LPT) tree. The CH340 should show up as USB-SERIAL CH340 (COM##). Depending on your computer, the COM port may show up as a different number.

Arduino IDE
If you have the Arduino IDE installed, you should also see a change in the number of available COM Ports (you may need to restart the Arduino IDE for the board to populate). Without the CH340 connected to your computer, in the IDE click on Tools > Port. Take note of the Serial Ports available:
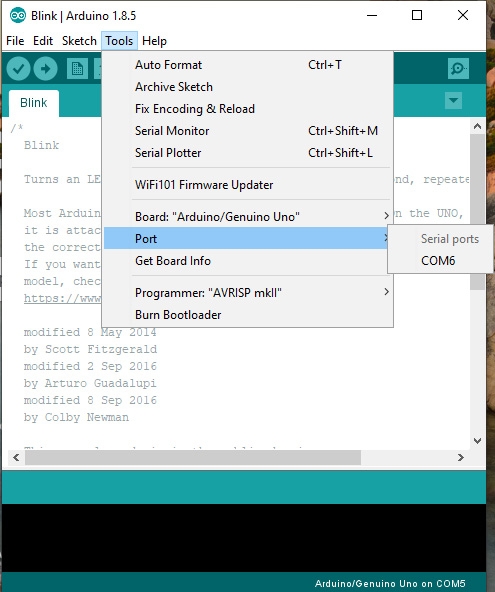
Connect the Arduino board with the CH340 to your computer’s USB port. Click somewhere else on the screen for the menu to refresh itself. Then go back to Tools > Port. A new COM port should appear. By process of elimination, the CH340 should have associated to the new COM port. Select this COM port in order to connect the IDE to your Arduino board.
In the example shown in these two screen shots, the new Arduino CH340 board is associated to COM Port 3.

Arduino/WEMOS Resources and Guides:
- Programming the ESP8266 WEMOS-D1 Using the Arduino IDE on Instructables: http://envistia.info/programming-wemos-d1-instructables
- Programming ESP8266 WeMos – D1 R2 using Arduino IDE on Elementz Tech Blog:
https://envistia.info/programming-esp8266-elementz - ESP8266 Chipset Datasheet: http://envistia.info/esp8266-chipset-datasheet
- How-To installation Video for Arduino IDE from educ8s.tv: http://envistia.info/wemos-d1-tutorial-youtube
- Getting Started with Arduino: http://envistia.info/ardgetstarted
- Arduino Software (IDE) download link: http://envistia.info/arduinoide
Copyright © 2018-2022 Envistia Mall
EM-MICRP-0020