
Search for your product name or keyword
D1 Mini Pro NodeMCU and Arduino WiFi LUA ESP8266 WeMos Microcontroller with Antenna
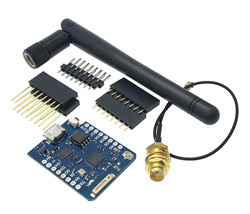 The D1 Mini Pro is an Arduino compatible microcontroller based on the WiFi-SoC ESP8266EX and is made for fast Internet-of-Things (IoT) prototyping. It offers the convenience of a micro-USB connection for both power and data (running at 3.3V), and despite its size has built-in WiFi and 4MB of flash memory. It can be programmed with Arduino or LUA, and supports both serial and OTA programming.
It is based on the WiFi-SoC ESP8266EX and is made for fast Internet-of-Things (IoT) prototyping. It is flashed with the NodeMCU firmware and can be set up and programmed right away with the on-board microUSB connection. With only few lines of code the NodeMCU Dev Kit is connected to your local network and ready to be controlled by other network members like computers and smartphones..
D1 Mini Pro Features and Specifications:
- Microcontroller: ESP-8266EX
- Operating Voltage: 3.3V Max (5V power from MicroUSB connector is internally converted to 3.3V)
- Digital I/O Pins: 11, all pins have interrupt/PWMI2C/one-wire support except D0
- Analog Input: 1 (3.2V max input)
- Connector: MicroUSB
- Clock Speed: 80MHz/160MHz
- Flash: 16M bytes
- USB Interface: CP2104 USB-TO-UART IC
- Antenna: Built-in ceramic antenna and connector for external U.FL antenna (included)
- Dimensions: 34mm x 25.5mm x 3.6mm excluding antenna
- Weight: Approx. 2.5g excluding connectors and external antenna
- Same dimensions as D1 Mini, but lighter
- Compatible with Arduino, Nodemcu and MicroPython
This D1 Mini Pro comes with 3 different types of header connectors to support various configurations: Female, Male, and Female/Male (long female). In most cases, the female headers are the best choice as they allow you to install the various shields that are available.

I/O Pins are on standard 0.1″ (0.254mm) centers
How to use use the D1 Mini Pro with the Arduino IDE:
- Install the CH340G Drivers on your computer. See the section below on installing the CH340 drivers
- Install the Arduino IDE software: http://envistia.info/arduinoide
- Install the ESP8266 Board Manager in the Arduino IDE *
- Install the ESP8266 Library *
- Install the Board *
- Connect & Select the D1 Mini *
* The installation and setup process is well documented in the following tutorial and Youtube videos:
D1 Mini setup tutorial on Averagemaker:
https://envistia.info/averagemaker-d1-mini-setup
WeMos Getting Started Guide on Instructables: https://envistia.info/instructables-wemos-getting-started-101
WeMos D1 Mini ESP8266 Getting Started with Arduino on Youtube: https://envistia.info/wemos-d1-mini-getting-started-youtube
Modifying the Wemos D1 Mini Pro To Use The External Antenna:
One of the main benefits of the D1 Mini Pro is that you can attach an external WiFi antenna for greater range. This is an optional feature, and it does require some resoldering to reroute the antenna signal from the built-in ceramic antenna to the external socket. There is a small surface mount (0603) Zero Ohm resistor (sometimes called a link) which needs to be rotated to enable this change. These videos describe the process in detail:
Modifying the Wemos D1 Mini-PRO for an EXTERNAL ANTENNA
Wemos D1 mini Pro how to move Zero Ohm Link to attach external antenna
Additional Resources and Guides:
Espressif Resources: https://www.espressif.com/en/products/hardware/esp8266ex/resources
NodeMCU Firmware: https://github.com/nodemcu/nodemcu-firmware
ESP8266 Arduino Core’s Documentation: http://arduino-esp8266.readthedocs.io/en/latest/index.html
ESP8266 Lua Loader: http://benlo.com/esp8266/
ESP8266 Datasheet: https://nurdspace.nl/ESP8266#Translated_datasheet
ESP8266 Chipset Datasheet: http://envistia.info/esp8266-chipset-datasheet
Getting Started with Arduino: http://envistia.info/ardgetstarted
The CH340G USB drivers may need to be installed on your computer before using this D1 Mini board with the Arduino IDE. If the Arduino IDE cannot communicate with your board, it is probably because the CH340G driver is not installed on your computer.
To install the CH340G driver on your computer:
The CH340 USB IC is made by WCH. You can find the latest version of their drivers in their English translated website here:
http://www.wch-ic.com/downloads/CH341SER_ZIP.html
Click on the “download” button on the WCH page to download the ch341ser.zip file to your computer.
Unzip (extract) the ch341ser.zip file.
Run the Setup application in the CH341SER folder of the unzipped file. See the screenshot below:
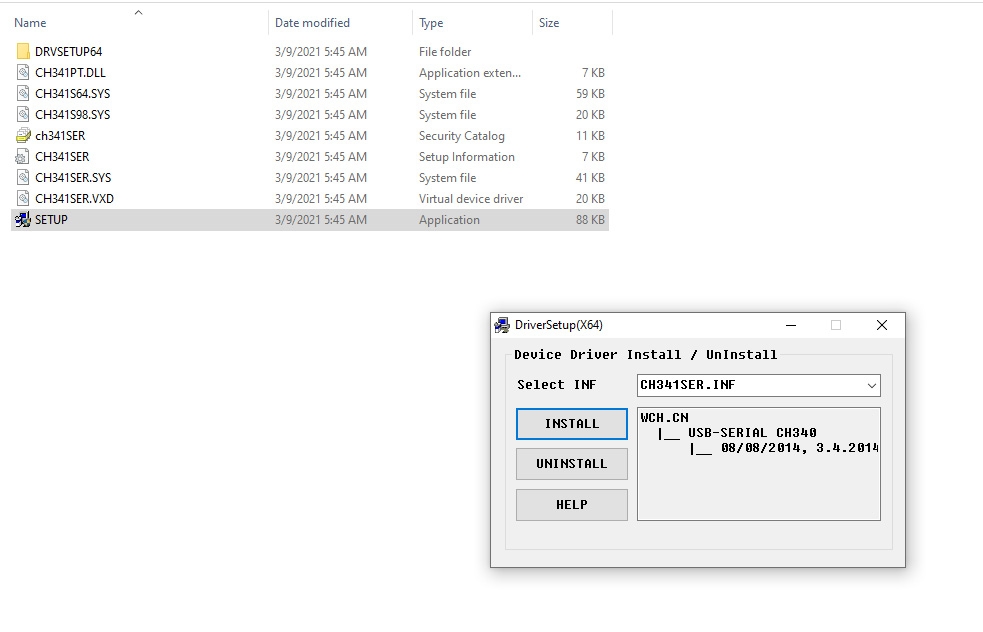
Click the “Uninstall” button first to remove any old versions, then click on the “Install” button.
CH340G Driver Verification for Windows:
To verify that your CH340G driver is working, you should see a difference in the Windows Device Manager and Arduino IDE Ports after plugging the D1 Mini board with a CH340 into a USB port on your computer.
Device Manager
To check that the CH340 associates to a COM port, open the Windows Device Manager. You can click the Start or ⊞ (Windows) button and type “device manager” to search for the application.
After opening the Device Manager, you will need to open the Ports (COM & LPT) tree. The CH340 should show up as USB-SERIAL CH340 (COM##). Depending on your computer, the COM port may show up as a different number.

Arduino IDE
If you have the Arduino IDE installed, you should also see a change in the number of available COM Ports (you may need to restart the Arduino IDE for the board to populate). Without the CH340 connected to your computer, in the IDE click on Tools > Port. Take note of the Serial Ports available:
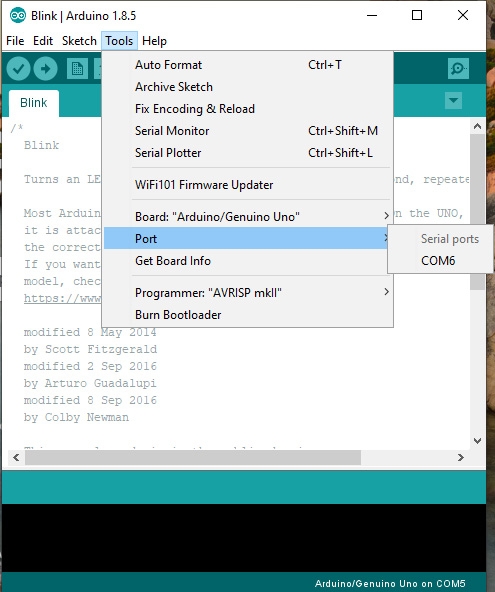
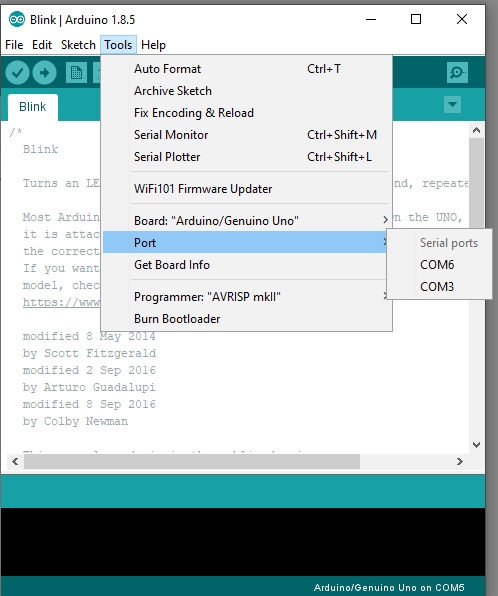
Connect the D1 Mini board with the CH340 to your computer’s USB port. Click somewhere else on the screen for the menu to refresh itself. Then go back to Tools > Port. A new COM port should appear. By process of elimination, the CH340 should have associated to the new COM port. Select this COM port in order to connect the IDE to your D1 Mini board.
In the example shown in these two screen shots, the new D1 Mini CH340 board is associated to COM Port 3.
Copyright © 2018-2021 Envistia Mall
EM-MICRP-0021